 There are three primary steps to prepare for effective and basic use of the Strummer Psaltery.
1. Tuning
2. Chord patterns
3. Strumming patterns
1. The Tuning process
1. The most critical thing to stay on top of is the tuning process. This is important simply because if the instrument is not in tune with itself it will not have a pleasant resonance and the singing to an instrument that is out of tune is very unsatisfying . It is just as true on the positive side when the instrument is in tune, it is so much more of a pleasant experience.
Therefore, having a tuning system that is understandable and effective is the first order of business. The business of tuning is an issue with most every instrument anyone will attempt to play. But the aspect of maintaining the instrument by keeping it in tune is not the most valuable experience as far as its reward of an artistic expression, however, it will contribute heavily to the enjoyment factor of playing it and singing with it as an artistic expression.
There is two parts to tuning: A. The use of equipment and/or process for tuning it. B. The awareness and reward of keeping it in tune.
There are a couple of tools useful for the equipment needed to effectively tune the instrument. A. For a laptop computer, the web site called – tunerr.com. – is free an so use the chromatic tuner for best use. B. if you have an Apple product: iPhone, iPad etc. you can get a free or cheap app to help use to tune up. We like the app called – Pano Tuner. Not Piano but Pano Tuner.
The awareness of the need for tuning is something one has to be sensitive to as one is learning to enjoy an instrument. This is developed as one grows with the maintenance of the use and understanding of an instrument.
It is always then important to listen to the strings being played to hear strings that may need to be adjusted.
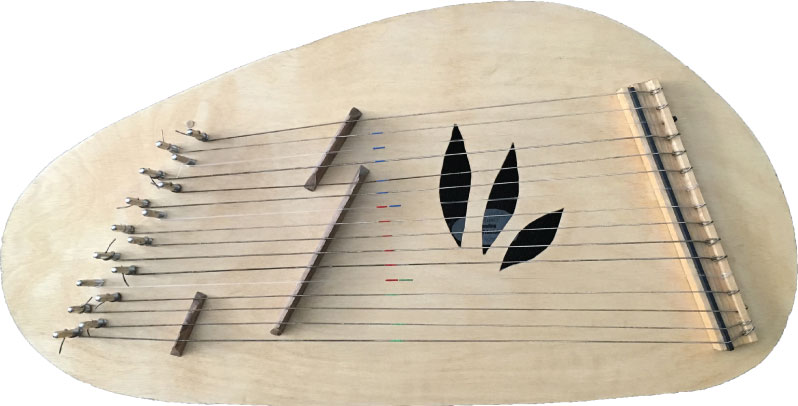
String notes from the lowest green strings going up to the top blue strings:
16. No paint – D (guitar # 4) Also could be Yellow painted string
15. Blue – F (guitar #4)
14. Blue – A (guitar – clear # 3)
13. Blue – F (guitar # 6)
12. Blue – C (guitar # 4)
11. Blue – A (guitar # 5)
10. Red & Blue – C (guitar – clear # 3)
9. Red – E (guitar # 4)
8. Red – G (guitar # 5)
7. Red – C (guitar # 6)
6. Red – E (guitar #6)
5. Red & Green – G (guitar clear # 3)
4. Green – B (guitar str. # 4)
3. Green – G (guitar str. # 5)
2. Green – D (guitar str. # 6)
1. Green – G or B (guitar str. # 6)
2. Chords on the Strummer
The key of C and the primary chords of that key are the chords first available. The string order permits a useful pallet of chords to enhance a selection of songs. The reality is this instrument’s primary chord set could accompany literally thousands of songs. However, its value is only realized if the one playing it can access the songs of which the player is familiar.
In the key of “C” – Chords from the Color of strings are the obvious Red (C chord), Green (G chord), Blue (F chord). Also available in this string arrangement are minor chords not yet colored on your instrument. This strings can be marked by you the player by the use of a permanent marker if you choose.
Notice the clear string in the middle of the Green (G) and Red (C) strings. There are four strings between these two chords which create the (E minor chord). In the same way, Between the two chords of the Red (C) and Blue (F) strings there are four strings which create the (A minor chord). Also the very top four strings of the instrument create a (D minor chord).
You are able to change keys on this instrument fairly simply by adjusting a few of the Blues strings to have the Key of G. The key of G has the primary chords of G chord, C chord and D chord. So what is originally as strings in Blue as an F chord will be change into a D chord by the following process.
This done by changing the following strings which are strings with an (F pitch) to an (F# or by a chromatic tuner it would be listed as a (Gb) “G flat” pitch. Those strings are found with the aid of an electronic tuner or by looking at the list order of strings above. The point is to simply tighten the F pitched strings (of which there are two) up one half step from F to F# (or also known as Gb “G flat”. Whala!
The way musical chord patterns work is simply like a journey. The journey we take is simple in general: we always start at Home=C chord and we end back Home=C chord. We leave from C and travel to either F chord or G chord and then we return Home to C chord. We go out again from C and some times we venture out to a G chord and then an F chord before retuning Home to C chord. The point is we may have a song that looks like this: C – F – C – G – C and is repeated. Or we may have a song pattern that looks like thus:
C – F – G – C – G – C. We may also the encounter a chord pattern like this: C – G – A minor – C – F – C – A minor – E minor – C.
The point is that songs all involve a chord pattern that begins with C and goes out to other chords but always ends in C.
3. Strumming Patterns
Strumming the strings has two major tips for effective sound production:
Two tips for general finger use.
1. Use your two fingers (1st &2nd fingers) as though they were as a paint brush. Keep these fingers together in brushing the strings. Let your other fingers swing freely along with the two “brush” fingers but just the two would make the main contact with the strings. This idea is that to not press too hard so that the strings are not heavenly pulled or stretched. That harder one presses into the strings the more retuning the strings will require.
Try to draw out the sound and not pound out the sound. Consider the use of just the fingers moving as a brush back and forth while keeping the hand and arm still.
2. A good perspective on strumming is to view the strings as a surface across the strings rather than a group of individual strings that one is plucking.
Strumming strings should feel like you are dusting off a table surface with a brush.